Sometimes we want a little more structure in our closets without the total confinement of custom shelves and DIY organizer units. This very basic closet setup featured on Real Simple shows us how we can achieve a very clean, easy-to-maintain aesthetic by adding just a few organizing products. Let’s deconstruct it!

What You’ll Need:
- 3-tier hanging fabric shelf
- Fabric drawers (set of 2)
- Two-tier or three-tier wooden shoe rack
- Small rope laundry/storage basket
- Small wire storage basket
- Wood clothes hangers
How-To:
Similar to doing a new hairstyle, closet organization projects have the best results when completed in a freshly cleaned, purged closet. Once you have determined the items you would like to keep in the closet, dusted any built-in shelves, and cleaned the floors, you can achieve the above-pictured organized closet design by following these steps:
1. Position your shoe rack in the corner of your choice. The two-tier wooden shoe rack listed above is designed to store six to eight pairs of shoes while the available three-tier option can store up to 12 pairs. Depending on the size of your closet, you may be able to fit more than one shoe rack if you have more shoes. In a standard, reach-in closet, I generally recommend positioning shoe racks against a wall or directly in a corner with the most frequently-worn shoes positioned on the side of the rack that is closest to the closet entrance for easier access.
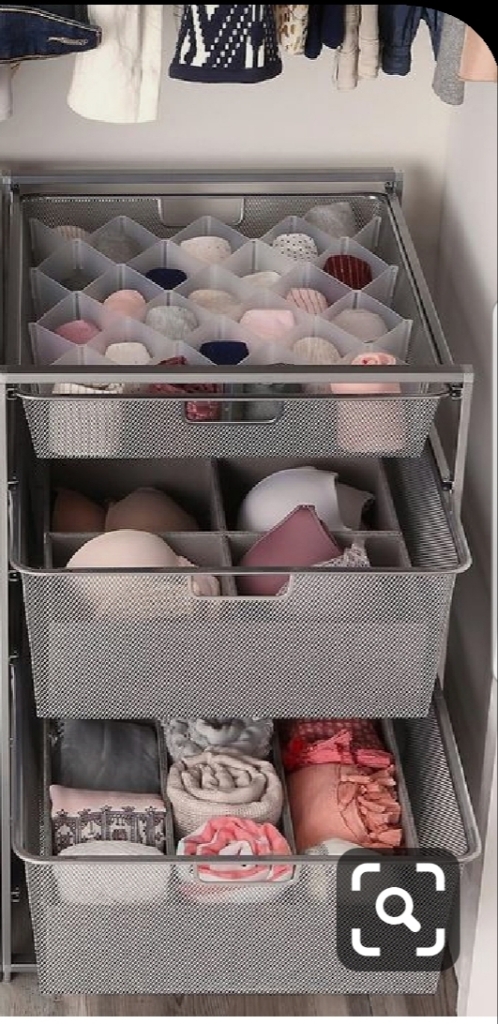
2. Position your fabric hanging shelf to one side of your closet rod. Inside the fabric shelf, you can store small items like scarves, socks, tights, and folded t-shirts. Adding the optional drawers makes the fabric shelf more suitable for storing intimate apparel or items you don’t need to access throughout the year like hats, gloves, and earmuffs. I recommend using the drawers to store items you would prefer to have out of sight. However, it is also important that you remember what you decide to store in the drawers. Otherwise, you may unknowingly go out and purchase duplicates. If you are afraid you won’t remember what’s stored in the drawers, feel free to add discrete labels.
On the open shelf, I recommend sticking to items you can neatly fold. Alternatively, you can also store items that do not require folding like a few small handbags and clutches or perhaps a few stackable hats. Whatever you decide to store on the open shelf, be sure you are able to maintain the appearance of these items.
3. Decide which clothing items you would like to keep on hangers, and transfer them over to the wood hangers. The closet in the photo only shows tops on hangers. However, in the supply list, I’ve recommended sturdier wood hangers that will allow you to also fold pants over the bottom rung. While these hangers are a little bulkier than some other styles like the popular slim velvet hangers, the hangers I’ve selected will give your closet a more upscale retail aesthetic. They also feature notches that will allow you to secure tops that have very thin straps and are more prone to slipping off of standard hangers.
To achieve the color scheme pictured above, start by positioning your white tops on the left side, and gradually add tops of darker colors as you move rightward, carefully keeping clothing within each color group together. Beginning with your white tops on the far left side will also help prevent color transfer onto your light-colored clothes. If you would like to include pants in this particular closet layout, I would recommend putting them on hangers and keeping them together in a separate section further to the right and also organized by color. You can also check out my post on my quick, go-to color-coordinating closet-organizing strategy.
4. Lastly, place your small hamper adjacent to your shoe rack on the opposite side of the closet. I recommend keeping the hamper in a position within the closet that will allow fresh air circulation if possible. Place the wire cube bin onto your closet’s upper shelf to create easy storage for lint rollers, fabric sprays, fashion tape, and other closet supplies.
Now, step back and admire your work. We did it!
Once again, the following supplies can be found at Amazon and delivered conveniently to your home. Thank you for supporting me by purchasing through my affiliate links:
- 3-tier hanging fabric shelf
- Fabric drawers (set of 2)
- Two-tier or three-tier wooden shoe rack
- Small rope laundry/storage basket
- Small wire storage basket
- Wood clothes hangers
Stay tuned as we deconstruct more picture-perfect spaces and learn how to make them our own!