3 Times You Should Do Major Cleaning in Your Home

A good homeowner understands they have the responsibility to clean their house daily. If you’re tidying up your home daily, it should only take between 15-30 minutes, and perhaps an hour once a week for more thorough cleaning. However, on certain occasions, your home requires a deep clean. Here are a few examples of when to put in some elbow grease!

At Least Once a Year 

Setting aside time to give your home a good deep clean once a year will refresh your space and give you a new start for the rest of the year. Many people choose to do this during certain seasons, such as spring or fall. According to Accent Maid Service, deep cleaning your home once a year will improve the air quality in your home by getting rid of dust and stale air. Taking the time to clean out forgotten spaces will also help you feel more relaxed and organized. A yearly cleaning refreshes your home and gives you an opportunity to perform maintenance tasks you would otherwise forget about.

Before Moving 

When planning a move, it is especially important to deep clean your old and your new space. Empty rooms are much easier to clean and help get rid of allergens. Decluttering your home will also help you discard unnecessary items, making your move easier. According to On the Move, one of the most effective ways to declutter is to go room by room. Sort your discarded items for what needs to be thrown away and what can be donated. Minimalism will give you more confidence and peace of mind as you move into a new place.

Before a New Baby 

New moms and dads have a lot on their plate when they welcome a little one into the world. According to Elevated Network, tending to the needs of the baby is demanding and causes a lot of cleaning tasks to fall by the wayside. Prior to bringing the new baby into your home, it is wise to have a major cleaning in your home performed. This will help prepare a clean space for you to relax and play with your little one. A major cleaning will also help sanitize your home, protecting your little one’s immune system.

Cleaning your home brings satisfaction and pride, helps you relax, and increases your productivity. Deep cleaning is also important for maintenance and event indicators. Major cleanings are necessary at least once a year, but should also happen before other major events. Completing this will make your next season of life much more enjoyable.

Read this next: Deconstructed – Add Drawer Storage to Your Closet

How to Prevent Your Stuff From Getting Ruined in Storage

People make use of storage units for a variety of reasons. Maybe you recently downsized and are out of storage space in your home. Maybe you’ve just accumulated more belongings than you can accommodate. Whatever the reason, storage units can be an important resource. That said, it’s important to take steps to keep your things from getting ruined while they’re being stored.

Invest in Security

Putting belongings into storage may mean you’re okay with doing without them for a time, but doesn’t mean you won’t be upset if they end up gone for good. Make sure you keep your belongings secure while they’re in storage, especially if you’re storing anything of particular value. Storage units often have cameras throughout their facility, but that really only acts as a deterrent. Invest in a quality lock and consider installing your own security cameras if allowed.

Be Aware of Moisture

Water has a way of getting anywhere and everywhere, given enough time. When storing your belongings, whether in your own home or in a storage unit, it’s especially important to be aware of moisture levels in the area. If you’re storing belongings in your home, choose areas that are constantly dry. In the case of a storage unit, opt for one with climate control if moisture is a concern. Carefully choose your storage containers as well. Items in plastic containers are more susceptible to mold growth. Of course, the use of desiccants and making sure both the container and what you’re storing is 100% dry before putting it in storage can help with that. Check your belongings regularly to make sure they aren’t suffering from moisture damage.

Protect Fragile Belongings

Some belongings warrant more protection than others. Fragile belongings require more careful care and attention when being stored. Be sure to carefully wrap them in protective materials and pack them so they don’t shift when moving the storage container. Avoid putting heavy containers on top of those holding fragile belongings. Over time, heavy containers can cause those underneath them to collapse, putting your things at risk. If you’re storing photographs or art pieces, consider that such items can be damaged by exposure to light. Minimize this to keep them in pristine condition.

Just because your things are in storage doesn’t mean it’s not necessary to take steps to protect them. Choose to invest in security, be aware of the threat moisture presents, and protect fragile belongings. This will help you keep your stuff safe and secure, ready for you the next time you need it.

Need help organizing your belongings? Book an appointment with me today!

DECONSTRUCTED – DIY Freezer Organization

Your freezer is a powerful ally in preserving frozen foods. The following tips will help you bring clarity, accessibility, and order to your top freezer.

[credit: simplyorganized.me]

Tools:

Containers with handles

Alternative size – container with handle (optional)

Ice bins (optional)

Expandable Shelf (optional)

**Measure your freezer space and verify product dimensions before purchasing

Procedure:

  1. Remove your freezer items.
  2. [Optional] If your freezer DOES NOT have a shelf, you may be able to create one by inserting an expandable shelf.
  3. Place frozen items into the assorted bins according to categories (meats, vegetables, ice cream, etc.) and size.
  4. If you are using an expandable shelf that does not fit your freezer from end to end, consider using taller containers on the outside edge(s), and place the shelf in the middle.
  5. Enjoy the newly-acquired visibility and accessibility to the items in your organized freezer.

Deconstructed – Kitchen Cabinet Organizing

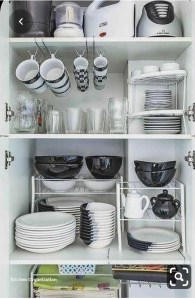
Kitchen cabinets can be a challenge. First, most kitchens have a variety of fragile dishes and glasses that come in shapes that often do not fit smoothly inside rectangular cabinet spaces. Then there is the issue of aesthetics. Perhaps you have a matching set you would like to keep together. Maybe you only use that set on certain occasions. How do you store those 50 commemorative wine glasses from your best friend’s recent milestone birthday celebration? How do you create a cohesive aesthetic in your cabinet if you have a multiple incomplete dish sets? Check out the photo and instructions below for one way you can quickly organize your cabinet with minimal fuss. Need to know where you can purchase the necessary tools? Click on the links in the supply list to order from Amazon using my affiliate code (I will receive a small commission, but the price of each item will remain unchanged – thank you!).

kitchen cabinet organizing supplies

Supply List:

How To:

  1. Insert mug hooks into the cabinet by attaching each row of hooks to shelf above space in which you would like to position your mugs. You can expect to store about four medium-sized mugs on each row of hooks.
  2. Position glasses for maximum visibility. Place taller glasses on the outside edges of the cabinet space. You can also substitute tall glasses for additional mugs nested together or short glasses from a matching set stacked to make a taller pile.
  3. Next, arrange all remaining glasses from left to right in order of height, shortest to tallest (see photo).
  4. Assemble the corner cabinet shelf, and place it in the far right corner. Place stacks of small plates underneath and on the middle row of the two-tier corner shelf. Place smaller items like ramekins on the very top of the shelf.
  5. Assemble your two sets of stackable kitchen cabinet shelves, and place them adjacent to each other on the next lowest empty cabinet shelf.
  6. Stack your plates together according to matching sets (or as desired), and place them underneath and in front the stackable shelf on the left. Place larger bowls on top of the stackable shelf. If you have a set of smaller bowls, stack them, and place them in front of the stackable shelf.
  7. Arrange remaining plates, bowls, and any specialty dishes on the remaining stackable shelf on the right similar to photo.

Note: If you have sets that do not match or dishes you use infrequently, position these directly underneath the the stackable shelf as they will be slightly less accessible and less visible than the dishes you place in front.

Deconstructed – Easy Closet Design with Hanging Shelves and Shoe Storage

Sometimes we want a little more structure in our closets without the total confinement of custom shelves and DIY organizer units. This very basic closet setup featured on Real Simple shows us how we can achieve a very clean, easy-to-maintain aesthetic by adding just a few organizing products. Let’s deconstruct it!

What You’ll Need:

How-To:

Similar to doing a new hairstyle, closet organization projects have the best results when completed in a freshly cleaned, purged closet. Once you have determined the items you would like to keep in the closet, dusted any built-in shelves, and cleaned the floors, you can achieve the above-pictured organized closet design by following these steps:

1. Position your shoe rack in the corner of your choice. The two-tier wooden shoe rack listed above is designed to store six to eight pairs of shoes while the available three-tier option can store up to 12 pairs. Depending on the size of your closet, you may be able to fit more than one shoe rack if you have more shoes. In a standard, reach-in closet, I generally recommend positioning shoe racks against a wall or directly in a corner with the most frequently-worn shoes positioned on the side of the rack that is closest to the closet entrance for easier access.

2. Position your fabric hanging shelf to one side of your closet rod. Inside the fabric shelf, you can store small items like scarves, socks, tights, and folded t-shirts. Adding the optional drawers makes the fabric shelf more suitable for storing intimate apparel or items you don’t need to access throughout the year like hats, gloves, and earmuffs. I recommend using the drawers to store items you would prefer to have out of sight. However, it is also important that you remember what you decide to store in the drawers. Otherwise, you may unknowingly go out and purchase duplicates. If you are afraid you won’t remember what’s stored in the drawers, feel free to add discrete labels.

On the open shelf, I recommend sticking to items you can neatly fold. Alternatively, you can also store items that do not require folding like a few small handbags and clutches or perhaps a few stackable hats. Whatever you decide to store on the open shelf, be sure you are able to maintain the appearance of these items.

3. Decide which clothing items you would like to keep on hangers, and transfer them over to the wood hangers. The closet in the photo only shows tops on hangers. However, in the supply list, I’ve recommended sturdier wood hangers that will allow you to also fold pants over the bottom rung. While these hangers are a little bulkier than some other styles like the popular slim velvet hangers, the hangers I’ve selected will give your closet a more upscale retail aesthetic. They also feature notches that will allow you to secure tops that have very thin straps and are more prone to slipping off of standard hangers.

To achieve the color scheme pictured above, start by positioning your white tops on the left side, and gradually add tops of darker colors as you move rightward, carefully keeping clothing within each color group together. Beginning with your white tops on the far left side will also help prevent color transfer onto your light-colored clothes. If you would like to include pants in this particular closet layout, I would recommend putting them on hangers and keeping them together in a separate section further to the right and also organized by color. You can also check out my post on my quick, go-to color-coordinating closet-organizing strategy.

4. Lastly, place your small hamper adjacent to your shoe rack on the opposite side of the closet. I recommend keeping the hamper in a position within the closet that will allow fresh air circulation if possible. Place the wire cube bin onto your closet’s upper shelf to create easy storage for lint rollers, fabric sprays, fashion tape, and other closet supplies.

Now, step back and admire your work. We did it!

Once again, the following supplies can be found at Amazon and delivered conveniently to your home. Thank you for supporting me by purchasing through my affiliate links:

Stay tuned as we deconstruct more picture-perfect spaces and learn how to make them our own!

Deconstructed – Add Drawer Storage to Your Closet

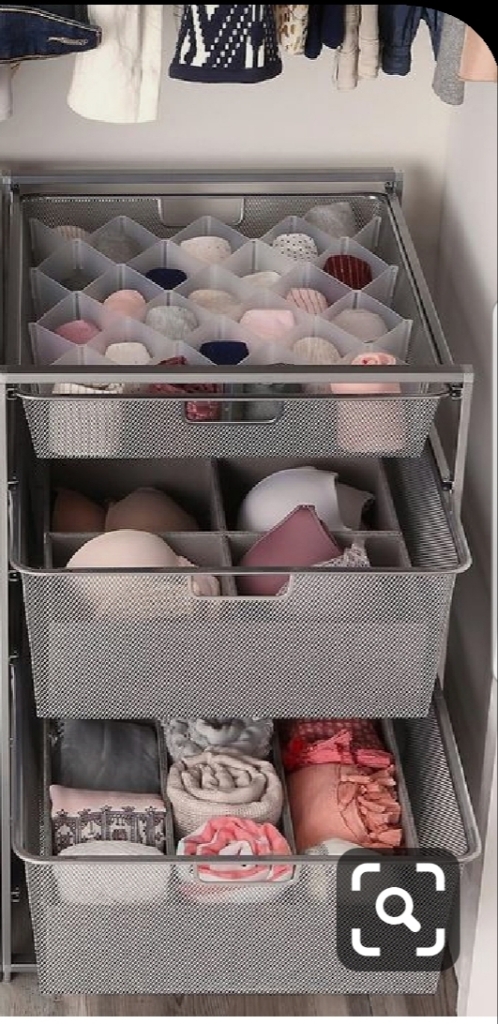
New Yorkers are well aware of the space constrains that sometimes mandate improvisation when it comes to choosing storage furniture. But space constraints exist in a variety of cities and settings. Whether your bedroom simply cannot accommodate a sufficiently-sized dresser, or if you prefer a more affordable, less permanent way of storing folded items, I’m here to help! I deconstructed a popular photo that was posted on Pinterest by Popsugar to help you recreate the look and functionality of the flexible closet storage solution pictured below:

How To:

Supply List:

Procedure

Start by purchasing all the required materials. To achieve the look in the photo, you may choose an organizing cart with wheels or one without wheels. You will need two of them if you would like double-sided storage. While the photo utilizes a stationary cart, I prefer to use wheeled carts when adding storage to closets. Wheeled storage carts can easily be rolled out of place for cleaning. They also provide easy mobility in the event your  storage needs change and you would like to reposition the cart or if you would like to use the storage cart in another area in your home.

Use The Top Drawers for Your Smallest Items

The top drawer is shallower than the remaining three. Therefore, it is best suited for storing underwear, socks, headbands, and other small items. To replicate the top drawers in the photo, you will need to make two grids. Assemble your drawer divider strips to create the number of slots you will need to accommodate the items you would like to store. Once constructed, insert an assembled grid into the top drawer of each cart.

The remaining drawers can be configured as needed. Two packs of fabric drawer organizers will give you more than enough organizers to divide among all the drawers.

Organizing The Right Side

To achieve the configuration on the right side of the photo, remove one of your three lower drawers, leaving two lower, larger drawers in your cart. Between your two packages of fabric drawer organizers, you should have a total of four small 5.5-inch x 5.5-inch cube organizers. For bra storage similar to the photo, place four small cubes into the second drawer. Fold your bras in half, and “nest” them together into four small groups. Place each nested group into the four fabric cube organizers.

To create a similar configuration to that of the third, and bottom, drawer on the right, use the rectangular fabric organizers. The sizing of the rectangular bins is perfect for leggings, scarves, or hand and face towels. Simply roll each item neatly, and place each roll side-by-side in the fabric organizer.

Organizing The Left Side

To achieve the look on the left side of the photo, leave all three of the lower, larger drawers in place. This will create a four-drawer configuration, including the shallow top drawer. On the second level, if you would like to create neat rows of stored items similar to the photo, use your remaining fabric organizers to neatly roll and arrange the items.

In the photo, the middle and bottom lower drawers on the left side house larger towels. They can also accommodate sweaters, jeans, t-shirts, and other items that easily fold into a rectangular shape. You may also opt to use your leftover fabric organizers to store smaller items that fit can neatly fit inside them.

All the products you need to create this look can be ordered from Amazon through the enclosed affiliate links (thanks for your support!):

If you are considering trying this closet configuration or if you would like to see another organize photo deconstructed and broken down into step-by-step instructions, let me know in the comments below!

Organize Your Home and Make Money By Selling On Poshmark


Photo by mentatdgt on Pexels.com

If you have found yourself with extra downtime and a little more uncertainty than usual, you may be looking for ways to occupy your time and make a little extra money. One of the best ways to generate income while tidying up your home is to sell excess items online. Whether your closet is overflowing with clothes, or if you are a makeup junkie with pallets you will never use, the Poshmark marketplace can connect you with willing and eager buyers. The following steps will help you get your Poshmark store off to a running start.

1. Visit poshmark.com or download their app in your mobile device store. You can access the marketplace and build your closet online or on your phone.
2. Enter your personal details, and set up your account by creating log-in credentials.
3. Create your closet! Carefully choose items that are in good condition and meet Poshmark’s guidelines. Your closet will attract more buyers if you start off with a decent amount of inventory. Start by uploading at least seven items for sale.
4. Add a photo! Including a photo and short bio will personalize your page and attract more buyers.
5. Be social. Poshmark is built on a social media-esque type of platform. Therefore, in order to attract buyers to your closet, you will have to interact with other people on the platform. Join parties. Follow other people’s accounts. Comment on items you like (no obligation to actually buy the item unless you want to).

Bonus: Share! Share! Share! Not only should you make a habit of sharing your listings a few times a day, but you should also share other people’s items. In return, they will share your items with their followers. Eventually, someone will see something they like in your closet, and you will make a sale!

This may all sound like a lot. But many of us have extra time on our hands, so it is definitely worth the time investment right now. Furthermore, once you’ve set up your account, all the hard work is done. Depending on the demand and popularity of your items, you should begin to see sales relatively quickly if you follow the above steps. Once I got set up, I made my first sale within a week!

If you are new to Poshmark, help me help you by entering my referral code: RL0214 so we can BOTH qualify for a $10 referral bonus.😉 If you have a poshmark store, drop your user name in the comment section, and let’s connect!

How to Keep a Small Apartment Organized

Moving into a new apartment can be an unnerving task, especially one with confined space. Home organization is not an easy task. It can be challenging for many reasons, from cleanliness to maintaining systems. You might be wondering how you could fit all your belongings into such a small place, but the good news is there are multiple solutions available to help you organize your small space.A cluttered home leads to a cluttered mind. A messy place can never bring mental clarity. No matter how small the place is, if you follow the below-mentioned rules, any place can become a happy place.

Living Room Organizing for a More Pleasant Gathering Space

Since the living room is the place where you spend most of your time when entertaining others, it is best not to keep it cluttered at all. Jackets, coats, and bags occupy a lot of space. As a space-saving solution, install hooks just inside the front door. Creating a mudroom or command center allows you to immediately store your outerwear and bags as soon as you enter the home. Creating coat and bag storage also makes things easier for visitors. If you do not want to hook a nail on the wall or door, simply use sticky hooks. To keep your entertainment equipment safe and away from sight, you may also incorporate storage furniture that blends well with your living room furniture. Many coffee tables come with storage boxes.

Bedroom Organizing for Strategic Storage Solutions

Making your bed every day can be a game-changer in your quest to keep your bed organized. When your bed is neatly made, the rest of the room will automatically appear to be more organized.Many people do not like storing things under the bed as they do not often clean under the bed. As an alternative, you might prefer a bed with drawers. You can keep often used things or off-season clothes in the drawer under the bed. Hang a shoe organizer inside the closet. An over-the-door shoe organizer can hold all types of footwear that might otherwise be cluttering your bedroom. There are many closet organizers are also available in the market today that help you organize things in a very elegant way. There are wire closet organizers and wooden closet organizers. You can hang clothes, place shoes and handbags and even display decorative pieces.

Bathroom Organizing for Space Maximization

Bathrooms are even smaller spaces. Make sure you get rid of the things you don’t need. Install utilitarian storage containers where you can keep your toothbrushes, toothpaste and other toiletries like soap and shampoo. Another small wall hanger can be installed to keep your hairdryer, etc.

Kitchen Organizing Solutions to Tame Clutter

The kitchen is another space that seems to attract clutter. Install wall hangers to hang the pots and pans. Use drawers and cabinets to store other utensils and cooking related gadgets. Keep items you seldom use on the top shelves.Take advantage of every hook and nook in the kitchen by installing a hanging spice rack. Place hanging storage containers at the back of the cabinet or pantry door to hold canned food or bottled food items.

By following some of the above-mentioned organizing suggestions, your small apartment will appear more orderly and spacious. A well-organized small apartment can feel as accommodating as any larger space as long as you keep these tips in mind.

5 Tools to Help You Organize Your Craft Room

If you love crafting in your downtime, chances are you also know the inherent clutter that comes along with arts and craft activities. The following tips and product recommendations will allow you to enjoy crafting while preventing your hobby from overtaking your space.

Keep small craft pieces contained by investing in a high-quality case.

The SnapCubes stackable arts and crafts case is a three-tier clear stackable storage container with compartments. It’s perfectly designed for jewelers, people who love to sew, as well as those who do beadwork. Small compartments within each layer of the case keep intricate pieces organized and neatly separated. A clear acrylic exterior allows for easy visibility. The case has a top handle which will make your craft supplies readily portable. The interlocking stackable design will save space.

A clear exterior and interior compartments make it easy to keep up with the tiniest craft supplies. https://amzn.to/2ILI5dz [affiliate link]

Grab a set of wheels, and put them in motion.

When organizing craft rooms, storage carts are typically a necessity. I prefer wheeled organizer carts with drawers over immobile pieces. While stationary furniture pieces make perfect sense in other parts of the home or office, arts and craft hobbies often involve moving from place to place to gather supplies. Many people also do their arts and crafts in rooms that serve multiple purposes. This is especially true of the confined spaces in metropolitan areas like New York City. If your crafting area serves multiple purposes, you likely find it necessary to occasionally stash craft supplies out of sight or in a more favorable location, especially if you typically convert the area the room to accommodate guests, to be used as a home office, or for any other purpose that does not immediately involve crafting.

The Seville Classics Organizer Cart is available in multiple sizes to suit your crafting needs and to complement the size of your space. The car is available with 6, 8, 10, or 15 drawers. Stylistically, the cart features multicolored drawers, which work well for categorizing and sorting arts and craft supplies and keeping them organized. The cart is wheeled, which makes it easy to take your crafting to other parts of the home or to stash your supplies quickly when you need to make space.

Multi-color compartments are great for organizing and color-coding according to category. https://amzn.to/35yyukn [affiliate link]

Another wheeled option, the IRIS 7-Drawer Rolling Storage Cart includes an organizer top, which is a simple compartmentalized tray that can house scissors, a hole punch, and other hand tools. The seven drawers are comprised of four shallow drawers in three deep bins. The shallow drawers are ideal for storing smaller crafting supplies while the deeper drawers are the perfect places to stash away incomplete craft projects that require days or weeks to finish.

A combination of large and small drawers accommodates smaller craft supplies and unfinished projects that require an extended period of time to finish. https://amzn.to/2OI3RTy [affiliate link]

Organize your desktop.

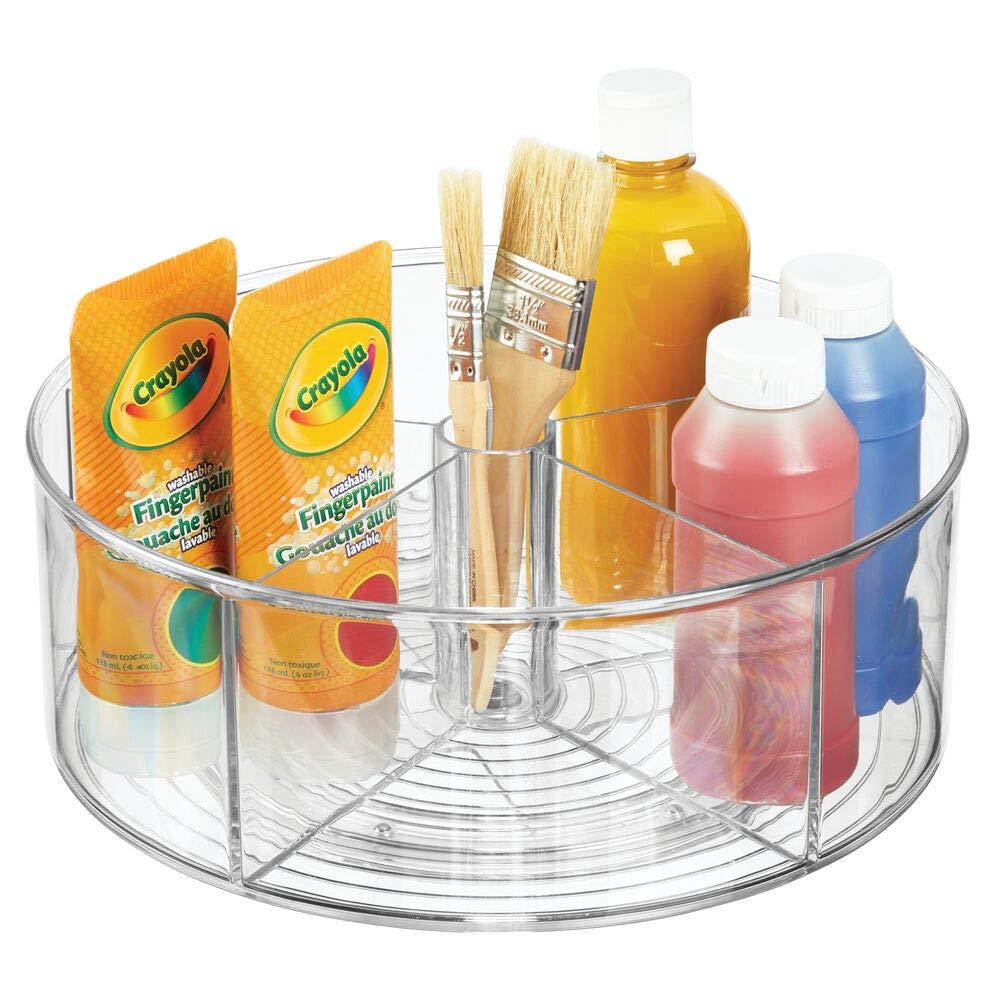
Keeping your craft room desktop organized can be a challenge. This is especially true for those who need boundaries and separation, neither of which a which an expansive open desktop provides. Fortunately, there are tools that can help you compartmentalize and organize your crafting desktop. The mDesign Lazy Susan Turntable Storage Organizing Container is perfect for organizing larger craft supplies. Divided into five compartments, the turntable storage container is spacious enought to accommodate supplies like glues, containers of glitter, and tubes of paint. A small cylindrical center compartment is sized for supplies like paint brushes, glue sticks, Exacto knives, and sponges.

Turntable organizer keeps desktops neat and attractive. https://amzn.to/2paBVgd [affiliate link]

Get a good desk or craft table.

In a craft room, your work surface is everything. A good craft desk will eliminate the need to purchase many different organizing and storage products. The South Shore Crea counter height craft table is a versatile piece of furniture for novices and for avid crafters. Taller than the average desk, the Crea craft table lends itself to working while standing or while seated on a stool or bar height chair. This craft table has ample storage including interchangeable modules, a wide drawer, and removable shelves. Its scratch-proof work table surface means your Crea craft table will retain its appearance and last for years of continuous crafting.

Removable drawers and shelves make this counter height craft table extra versatile. https://amzn.to/2MzHGMC [affiliate link]

Live in New York City? Need help organizing your space? Give us a call, or book your appointment online.

5 Reasons You’re Afraid to Contact a Professional Organizer (And Why You Should Do It Anyway)

We’ve all been there. You can’t find your keys… for the third time this week. Where did you leave that other shoe? You’re already running 15 minutes late for work. Perhaps all your friends and family know 8 p.m. really means 8:30 when planning social events. Maybe you hate doing laundry because folding just isn’t your thing. Or maybe you’ve moved into a new place, without setting aside time to figure out how to make your new living space truly feel like home. The following five reasons are common obstacles that may be preventing you from contacting a professional organizer.

1. You never knew home organizing professionals existed.

Like cooking, carpentry, and decorating, home organizing is a learned skill that can be greatly enhanced by natural talent. There are people who possess the skills to perform these services for themselves. There are also people who are naturally drawn to these tasks and are motivated to help others by turning their skills into highly sought-after services. Home organizing is no different. Professional organizing began to rise in popularity as an industry in 1984. Los Angeles receives credit as the birthplace of the home organizing profession. Today, professional organizing has expanded around the world, and home organizers are available in most major cities. Even those who live in mid-sized cities and smaller towns have access to professional home and office organizing services in their communities.

2. You feel embarrassed about needing help with organizing.

People generally feel ashamed of their clutter. Some people are secretly afraid their unorganized space will be criticized as a personal failure. Executives who work in high-ranking positions are also more inclined to view their own disorganized desks and cluttered closets as a shameful secret that contradicts their carefully curated professional image. Some people anxiously believe others will equate their disorganization to general irresponsibility or even a lack of morality.

The good news is all these notions are generally false. For most people, the challenges they experience in maintaining an organized home are the result of never having learned a system for organizing that was personally effective. In order for a system to be effective, it must be compatible with your personality, your habits, your learning style, and, ultimately, your lifestyle. There is no singular way to stay organized. Working with an organizing professional can help individuals who struggle with maintaining an orderly space identify strategies that can make it possible to achieve their organizing goals and maintain positive, lasting results.

3. You aren’t sure how to communicate your needs to a professional organizer.

Sometimes we know our struggle, but we are unable to imagine what an effective remedy may look like. Professional organizers are able to help those who struggle with organizing understand the underlying causes of their difficulties and identify effective solutions. The first step toward addressing an issue with organizing is to contact a professional to discuss your current struggles and your lifestyle goals. Organizers are generally able to identify causal relationships and envision solutions you may not otherwise perceive in the absence of professional guidance.

4. You don’t know where to find a professional organizer.

The best place to learn more about professional organizers and to find one nearby is a basic Google search. Look for customer feedback on search engines, business directories, and social media platforms. Remember to read each review critically and to look for common complaints or common points of praise. Real estate agents, home renovators, and moving companies are other valuable resources that can often recommend a professional home organizer in your city.

5. You are convinced you cannot afford a professional organizer.

Each professional organizer’s target clientele and price range varies. The same is true of each organizing professional’s methodology and service offerings. Some organizers offer consultations that allow the client to take the knowledge he or she gains from the organizer and DIY his or her own space. Other organizing services allow the client to be completely hands-off. These services often include all necessary organizing supplies and a team to complete the project without much interaction with the client. Reach out to multiple professional organizers to determine whether they are able to offer the level of guidance and service you require to achieve your desired outcome.

The idea of inviting an organizing professional into your home may seem intimidating as people generally consider their homes to be their intimate space. Nevertheless, you can rest assured that professional organizers generally maintain a standard of professionalism. Therefore, they generally do not pass judgment, nor is the aim to deliberately make you feel uncomfortable. If you are feeling anxious about working with a professional organizer, we recommend having an honest conversation about your concerns prior to allowing the service provider to enter your home.

We offer professional, courteous, and discrete service to corporate Executives, entertainment industry professionals, and business owners in the New York City area who would like to create a more organized, balanced, and peaceful living space, workspace, and lifestyle. Visit our Services page for more information.