New Yorkers are well aware of the space constrains that sometimes mandate improvisation when it comes to choosing storage furniture. But space constraints exist in a variety of cities and settings. Whether your bedroom simply cannot accommodate a sufficiently-sized dresser, or if you prefer a more affordable, less permanent way of storing folded items, I’m here to help! I deconstructed a popular photo that was posted on Pinterest by Popsugar to help you recreate the look and functionality of the flexible closet storage solution pictured below:

How To:
Supply List:
- organizing cart (2 wheeled or unwheeled carts)
- plastic drawer divider strips (2 packs)
- fabric drawer organizers (2 sets)
Procedure
Start by purchasing all the required materials. To achieve the look in the photo, you may choose an organizing cart with wheels or one without wheels. You will need two of them if you would like double-sided storage. While the photo utilizes a stationary cart, I prefer to use wheeled carts when adding storage to closets. Wheeled storage carts can easily be rolled out of place for cleaning. They also provide easy mobility in the event your storage needs change and you would like to reposition the cart or if you would like to use the storage cart in another area in your home.
Use The Top Drawers for Your Smallest Items
The top drawer is shallower than the remaining three. Therefore, it is best suited for storing underwear, socks, headbands, and other small items. To replicate the top drawers in the photo, you will need to make two grids. Assemble your drawer divider strips to create the number of slots you will need to accommodate the items you would like to store. Once constructed, insert an assembled grid into the top drawer of each cart.
The remaining drawers can be configured as needed. Two packs of fabric drawer organizers will give you more than enough organizers to divide among all the drawers.
Organizing The Right Side
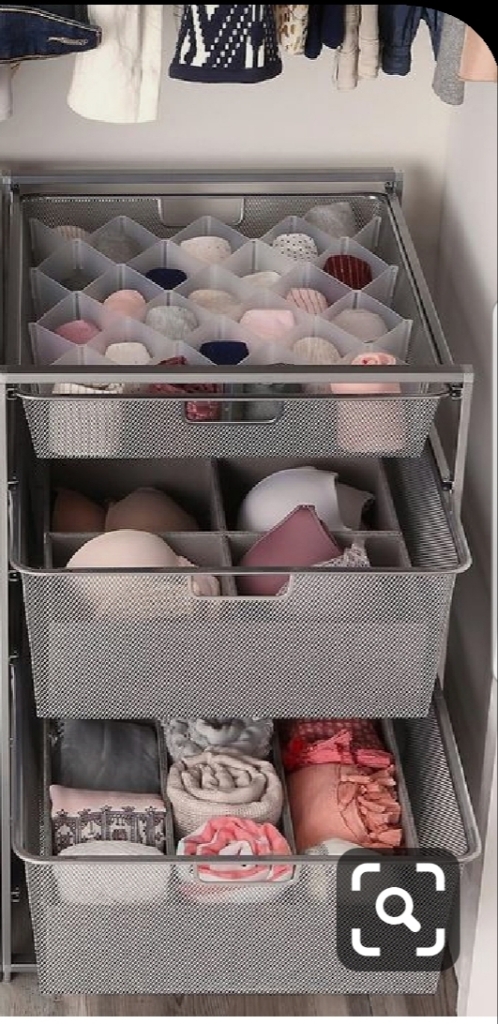
To achieve the configuration on the right side of the photo, remove one of your three lower drawers, leaving two lower, larger drawers in your cart. Between your two packages of fabric drawer organizers, you should have a total of four small 5.5-inch x 5.5-inch cube organizers. For bra storage similar to the photo, place four small cubes into the second drawer. Fold your bras in half, and “nest” them together into four small groups. Place each nested group into the four fabric cube organizers.
To create a similar configuration to that of the third, and bottom, drawer on the right, use the rectangular fabric organizers. The sizing of the rectangular bins is perfect for leggings, scarves, or hand and face towels. Simply roll each item neatly, and place each roll side-by-side in the fabric organizer.
Organizing The Left Side

To achieve the look on the left side of the photo, leave all three of the lower, larger drawers in place. This will create a four-drawer configuration, including the shallow top drawer. On the second level, if you would like to create neat rows of stored items similar to the photo, use your remaining fabric organizers to neatly roll and arrange the items.
In the photo, the middle and bottom lower drawers on the left side house larger towels. They can also accommodate sweaters, jeans, t-shirts, and other items that easily fold into a rectangular shape. You may also opt to use your leftover fabric organizers to store smaller items that fit can neatly fit inside them.
All the products you need to create this look can be ordered from Amazon through the enclosed affiliate links (thanks for your support!):
If you are considering trying this closet configuration or if you would like to see another organize photo deconstructed and broken down into step-by-step instructions, let me know in the comments below!
